Multicluster feature was introduced in the Istio 0.8 release, which allows the extension of the service mesh across multiple Kubernetes clusters. The primary goal of Istio multicluster is to manage a mesh composed of services running within more than one cluster but with all of the services running under a single administrative control. With Istio multicluster mesh, the location of the service deployment is transparent to the client and all services are the same.
There are two possible deployment topology available in Istio 1.1 to achieve this goal:
- A single central Istio control plane that manages all the services in the mesh.
- Multiple synchronized Istio control planes that have replicated service and Istio configurations.
Istio multicluster started to support the first deployment topology since release 0.8. However, due to limitations of the underlying cloud deployment platform and performance bottleneck of pilot at scale, it hasn’t been commonly adopted. See Multi Cluster Support for Service Mesh with IBM Cloud Private to learn how to setup Istio service mesh across multiple IBM Cloud Private clusters with one central Istio control plane.
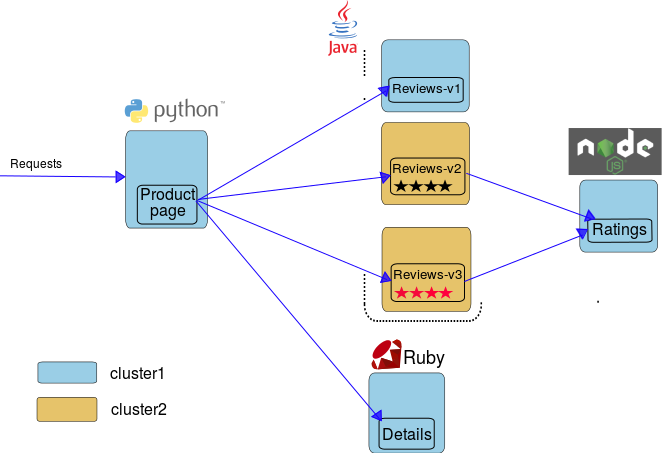
In this article, I will demonstrate how to setup the multiple control plane deployment topology with two IBM Cloud Private clusters. More specifically, I will deploy an Istio mesh across multiple clusters using Istio Gateway to access remote services. I will also illustrate how to configure Istio route rules to call remote services in a multicluster service mesh by deploying the bookinfo sample. View the Bookinfo Deployment Overview diagram for a description of the overall deployment topology.
The Multiple control plane topology
In the multiple control plane deployment topology, each IBM Cloud Private cluster will install an identical Istio control plane and each control plane manages its own services. To achieve cross cluster communication by using mutation TLS (mTLS), I will configure a common root Certificate Authority (CA) and Istio multicluster gateways for the respective clusters. All clusters are within a shared administrative control for policy enforcement and security. There are no special networking restrictions for this topology, therefore it’s generally considered the easiest approach to start with when there is no universal connectivity across clusters.
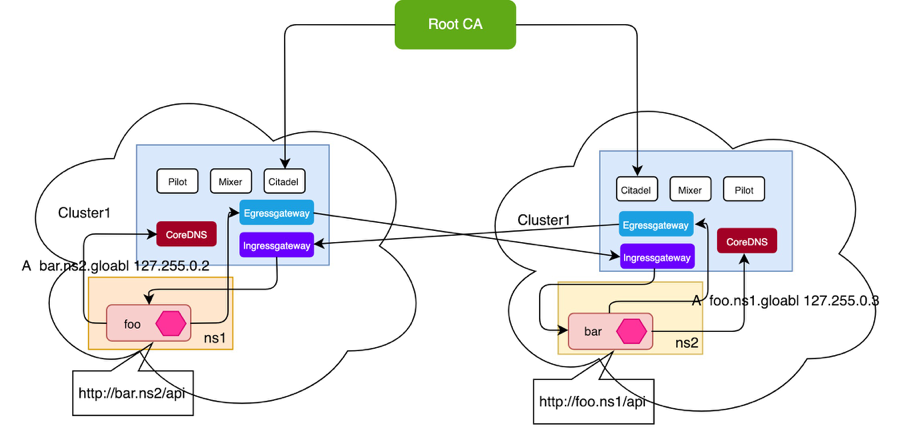
Service communication inside of the cluster use Kubernetes DNS suffix, e.g. foo.ns1.svc.cluster.local. For service discovery across clusters, Istio provides a CoreDNS plugin that can be configured in kube-dns to handle DNS resolutions for services in your remote cluster in the following format: <name>.<namespace>.global. For example, requests to any cluster to bar.ns2.global will resolve to the bar service in namespace ns2 of the corresponding cluster.
Setting up the Istio mesh across multiple IBM Cloud Private clusters
Prepare and install two IBM Cloud Private Clusters
To prepare and install your two IBM Cloud Private clusters, see Installation and validation from IBM Cloud Private Knowledge Center. For the sake of simplicity, I will leave out the cluster setup steps. The overall information of the two clusters are as follow:
- Cluster1
name: cluster1
network_cidr: 10.1.0.0/16
- cluster2
name: cluster2
network_cidr: 10.1.0.0/16
Note: This multicluster deployment topology does not require unique Pod Classless Inter-domain Routing (CIDR) setting for each cluster, which is one of the main difference from the first deployment topology.
After the two IBM Cloud Private cluster installations are complete, you can move on to the next step.
Deploy the Istio control plane in each cluster
- Download the Istio 1.1 release package from the Istio release site corresponding to your operating system (OS). For example, if your OS is Linux, run the following command:
$ curl -LO https://github.com/istio/istio/releases/download/1.1.0/istio-1.1.0-linux.tar.gz
- Run the following commands to extract the Istio package. Enter the release directory and add the
istioctlbinary to yourPATHenvironment variable:
$ tar -xzf istio-1.1.0-linux.tar.gz
$ cd istio-1.1.0
$ export PATH=$PWD/bin:$PATH
- Prepare the root CA certificates for
Citadelfor all of your clusters. The shared root CA is used by cross cluster mTLS communication.
Note: The following instructions use the certificates from the Istio samples directory for both clusters. In your production environment, you should use the CA certificate signed by your organization’s root CA.
- Generate the Istio deployment manifest YAML file with multicluster gateways by using
Helm, run the following command:
$ cat install/kubernetes/helm/istio-init/files/crd-* > $HOME/istio-multicluster.yaml
$ helm template install/kubernetes/helm/istio --name istio --namespace istio-system -f install/kubernetes/helm/istio/example-values/values-istio-multicluster-gateways.yaml >> $HOME/istio-multicluster.yaml
- Create a Kubernetes
secretthat contains your generatedCAcertificates. Run the following commands in each cluster:
$ kubectl create namespace istio-system
$ kubectl create secret generic cacerts -n istio-system \
    --from-file=samples/certs/ca-cert.pem \
    --from-file=samples/certs/ca-key.pem \
    --from-file=samples/certs/root-cert.pem \
    --from-file=samples/certs/cert-chain.pem
- Run the following command to apply the Istio installation manifest YAML file that was generated in the previous step to install Istio in each cluster:
$ kubectl apply -f $HOME/istio-multicluster.yaml
- Verify that the Istio service and pods are ready by running the following command:
$ kubectl -n istio-system get svc,pod
NAME                             TYPE           CLUSTER-IP       EXTERNAL-IP                     PORT(S)                                                                                                                                      AGE
service/istio-citadel            ClusterIP      172.30.31.4      <none>                          8060/TCP,15014/TCP                                                                                                                           1m
service/istio-galley             ClusterIP      172.30.142.84    <none>                          443/TCP,15014/TCP,9901/TCP                                                                                                                   1m
service/istio-ingressgateway     LoadBalancer   172.30.146.214   9.30.254.120                    80:31380/TCP,443:31390/TCP,31400:31400/TCP,15029:31940/TCP,15030:31013/TCP,15031:30557/TCP,15032:31641/TCP,15443:31972/TCP,15020:31881/TCP   1m
service/istio-pilot              ClusterIP      172.30.168.177   <none>                          15010/TCP,15011/TCP,8080/TCP,15014/TCP                                                                                                       1m
service/istio-policy             ClusterIP      172.30.16.185    <none>                          9091/TCP,15004/TCP,15014/TCP                                                                                                                 1m
service/istio-sidecar-injector   ClusterIP      172.30.14.158    <none>                          443/TCP                                                                                                                                      1m
service/istio-telemetry          ClusterIP      172.30.29.50     <none>                          9091/TCP,15004/TCP,15014/TCP,42422/TCP                                                                                                       1m
service/istiocoredns             ClusterIP      172.30.155.122   <none>                          53/UDP,53/TCP                                                                                                                                1m
service/prometheus               ClusterIP      172.30.122.178   <none>                          9090/TCP                                                                                                                                     1m
NAME                                               READY     STATUS      RESTARTS   AGE
pod/istio-citadel-69d57d7944-7qpj5                 1/1       Running     0          1m
pod/istio-cleanup-secrets-1.1.0-k678m              1/1       Completed   0          1m
pod/istio-galley-6986bf67cb-jhx8q                  1/1       Running     0          1m
pod/istio-ingressgateway-56b8f56568-zr6v5          1/1       Running     0          1m
pod/istio-pilot-56d455777d-w25cf                   1/2       Running     0          1m
pod/istio-policy-64cdcd4d7f-kdpt4                  2/2       Running     0          1m
pod/istio-security-post-install-1.1.0-rc.3-5hrg9   0/1       Completed   0          1m
pod/istio-sidecar-injector-7bf6cbc9bb-dmstc        1/1       Running     0          1m
pod/istio-telemetry-664f7d7789-lbs7q               2/2       Running     0          1m
pod/istiocoredns-c87b95d6-d9549                    2/2       Running     0          1m
pod/prometheus-89bc5668c-k97sf                     1/1       Running     0          1m
As you verify the Istio service and pods from the output, you may notice that a extra service called istiocoredns, is deployed. istiocoredns is used to handle DNS resolution for remote services.
- Verify that the multicluster gateways are ready by running the following command:
$ kubectl -n istio-system get gateways
NAME                                AGE
istio-multicluster-egressgateway    5m
istio-multicluster-ingressgateway   5m
You have deployed two identical Istio control plane in the IBM Cloud Private clusters and are ready to move to the next step.
Configure the kube-dns to resolve the remote services
In the previous step, we found that the Istio control plane also provides a CoreDNS plugin to handle DNS resolution for services for services in your remote cluster in the following format <name>.<namespace>.global. In order to utilize this DNS plugin, the Kubernetes DNS needs to be configured to point to istiocoredns as the DNS server for the .global DNS domain.
For an IBM Cloud Private cluster, you need to update the existing Kubernetes DNS configMap named kube-dns for each cluster that will be calling services in your remote clusters. Run the following command to configure the Kubernetes DNS:
$ cat <<EOF | kubectl apply -f -
apiVersion: v1
kind: ConfigMap
metadata:
  name: kube-dns
  labels:
    app: kube-dns
    release: kube-dns
    heritage: Tiller
    addonmanager.kubernetes.io/mode: EnsureExists
data:
  Corefile: |
    .:53 {
        errors
        health
        kubernetes cluster.local in-addr.arpa ip6.arpa {
            pods insecure
            upstream
            fallthrough in-addr.arpa ip6.arpa
        }
        prometheus :9153
        proxy global $(kubectl get svc -n istio-system istiocoredns -o jsonpath={.spec.clusterIP})
        proxy . /etc/resolv.conf
        cache 30
        reload
    }
EOF
Deploy the Bookinfo sample
- Deploy the bookinfo application in
cluster1and then delete thereviewsdeployment of versionsv2andv3. Run the following commands:
$ kubectl label ns default istio-injection=enabled
$ kubectl apply -f samples/bookinfo/platform/kube/bookinfo.yaml
$ kubectl delete deploy reviews-v2 reviews-v3
- Deploy the
ratingsservice and versionv2andv3of the reviews services incluster2. Run the following command:
$ kubectl label ns default istio-injection=enabled
$ cat <<EOF | kubectl apply -f -
apiVersion: v1
kind: Service
metadata:
  name: ratings
  labels:
    app: ratings
spec:
  ports:
  - port: 9080
    name: http
  selector:
    app: ratings
---
apiVersion: extensions/v1beta1
kind: Deployment
metadata:
  name: ratings-v1
spec:
  replicas: 1
  template:
    metadata:
      labels:
        app: ratings
        version: v1
    spec:
      containers:
      - name: ratings
        image: istio/examples-bookinfo-ratings-v1:1.10.0
        imagePullPolicy: IfNotPresent
        ports:
        - containerPort: 9080
---
apiVersion: v1
kind: Service
metadata:
  name: reviews
  labels:
    app: reviews
spec:
  ports:
  - port: 9080
    name: http
  selector:
    app: reviews
---
apiVersion: extensions/v1beta1
kind: Deployment
metadata:
  name: reviews-v2
spec:
  replicas: 1
  template:
    metadata:
      labels:
        app: reviews
        version: v2
    spec:
      containers:
      - name: reviews
        image: istio/examples-bookinfo-reviews-v2:1.10.0
        imagePullPolicy: IfNotPresent
        ports:
        - containerPort: 9080
---
apiVersion: extensions/v1beta1
kind: Deployment
metadata:
  name: reviews-v3
spec:
  replicas: 1
  template:
    metadata:
      labels:
        app: reviews
        version: v3
    spec:
      containers:
      - name: reviews
        image: istio/examples-bookinfo-reviews-v3:1.10.0
        imagePullPolicy: IfNotPresent
        ports:
        - containerPort: 9080
EOF
- Create the bookinfo gateway in
cluster1and then access thebookinfoapplication through the gateway by running the following commands:
$ kubectl apply -f samples/bookinfo/networking/bookinfo-gateway.yaml
$ export INGRESS_PORT=$(kubectl -n istio-system get service istio-ingressgateway -o jsonpath='{.spec.ports[?(@.name=="http2")].nodePort}')
$ export INGRESS_HOST=$(kubectl get po -l istio=ingressgateway -n istio-system -o 'jsonpath={.items[0].status.hostIP}')
$ export GATEWAY_URL=$INGRESS_HOST:$INGRESS_PORT
Point your browser to http://$GATEWAY_URL/productpage to view the bookinfo web page. If you refresh the page several times, you might see the productpage with reviews and details services, but without the ratings service because only v1 of the reviews service is running on cluster1 and it does not call the ratings services. Continue to follow the steps to learn how to add reviews services of version v1 and v2 to the entire mesh.
- Get the
host IPand theNodePortof Istio ingress gateway incluster2. Run the following commands:
$ export CLUSTER2_GW_HOST=$(kubectl get pod -l app=istio-ingressgateway \
    -n istio-system -o jsonpath='{.items..status.hostIP}')
$ export CLUSTER2_GW_PORT=$(kubectl get svc -n istio-system istio-ingressgateway \
    -o=jsonpath='{.spec.ports[?(@.port==15443)].nodePort}')
Note: Since IBM Cloud Private does not provide built-in support for the
LoadBalancerservice, you must use thenodePortto access the gateway. If you want enableLoadBalancerservice type in IBM Cloud Private, see Working with LoadBalancer services on IBM Cloud Private for more details.
- Create ServiceEntry and DestinationRule for the reviews service in cluster2.
Important: Every service that needs to be accessed from a remote cluster requires a
ServiceEntryconfiguration in the remote cluster. The host used in theServiceEntryshould be of the form<name>.<namespace>.globalwhere name and namespace correspond to the service’s name and namespace respectively.
For DNS resolution to services under the *.global domain, we need to assign these services an IP address and it must be in the address field of corresponding ServiceEntry configuration. It is recommended that the IPs are non-routable outside of a pod. For the ServiceEntry example, use the IPs in 127.255.0.0/16. Application traffic for the IPs will be captured by the Istio sidecar and routed to the ingress gateway of the corresponding remote cluster.
- Create
ServiceEntryandDestinationRuleconfigurations. Run the following command:
$ cat <<EOF | kubectl apply -f -
apiVersion: networking.istio.io/v1alpha3
kind: ServiceEntry
metadata:
  name: reviews-default
spec:
  hosts:
  # must be of form name.namespace.global
  - reviews.default.global
  # Treat remote cluster services as part of the service mesh
  # as all clusters in the service mesh share the same root of trust.
  location: MESH_INTERNAL
  ports:
  - name: http1
    number: 9080
    protocol: http
  resolution: DNS
  addresses:
  # the IP address to which reviews.default.global will resolve to
  # must be unique for each remote service, within a given cluster.
  # This address need not be routable. Traffic for this IP will be captured
  # by the sidecar and routed appropriately.
  - 127.255.0.2
  endpoints:
  # This is the routable address of the ingress gateway in cluster2 that
  # sits in front of productpage service. Traffic from the sidecar will be
  # routed to this address.
  - address: ${CLUSTER2_GW_HOST}
    ports:
      http1: ${CLUSTER2_GW_PORT}
    labels:
      cluster: cluster2
---
apiVersion: networking.istio.io/v1alpha3
kind: DestinationRule
metadata:
  name: reviews-global
spec:
  host: reviews.default.global
  trafficPolicy:
    tls:
      mode: ISTIO_MUTUAL
  subsets:
  - name: v2
    labels:
      cluster: cluster2
  - name: v3
    labels:
      cluster: cluster2
EOF
Note: The labels of the subsets in the destination rule map to the
ServiceEntryendpoint label, (cluster: cluster2) correspond to thecluster2gateway. Once the request reaches the destination cluster, the localDestinationRuleconfiguration can be used to identify the actual pod labels (version:v2or version:v3).
- Run the following command to define the subset v1 with DestinationRule in
cluster1:
$ cat <<EOF | kubectl apply -f -
apiVersion: networking.istio.io/v1alpha3
kind: DestinationRule
metadata:
  name: reviews
spec:
  host: reviews.default.svc.cluster.local
  trafficPolicy:
    tls:
      mode: ISTIO_MUTUAL
  subsets:
  - name: v1
    labels:
      version: v1
EOF
- Define the subsets of
v2andv3withDestinationRuleincluster2by running the following command:
$ cat <<EOF | kubectl apply -f -
apiVersion: networking.istio.io/v1alpha3
kind: DestinationRule
metadata:
  name: reviews
spec:
  host: reviews.default.svc.cluster.local
  trafficPolicy:
    tls:
      mode: ISTIO_MUTUAL
  subsets:
  - name: v2
    labels:
      version: v2
  - name: v3
    labels:
      version: v3
EOF
- Create a
VirtualServiceconfiguration oncluster1that route thereviewsservice traffic for the userjasonto thereviewsversionsv2andv3(50/50) and traffic for any other user to thereviewsversionv1:
$ cat <<EOF | kubectl apply -f -
apiVersion: networking.istio.io/v1alpha3
kind: VirtualService
metadata:
  name: reviews
spec:
  hosts:
    - reviews.default.svc.cluster.local
  http:
  - match:
    - headers:
        end-user:
          exact: jason
    route:
    - destination:
        host: reviews.default.global
        subset: v2
      weight: 50
    - destination:
        host: reviews.default.global
        subset: v3
      weight: 50
  - route:
    - destination:
        host: reviews.default.svc.cluster.local
        subset: v1
EOF
- Verify that the route rules across the entire mesh are working as expected:
Return to the /productpage of the bookinfo application and log in as a user and refresh the browser. You should see the display alternating between black and red ratings stars (v2 and v3). If you log out the user jason or log in as another user, the reviews service appears without ratings service (v1).
Summary
In this article, I demonstrated how to setup an Istio mesh across multiple IBM Cloud Private clusters using Istio Gateway. To achieve cross clusters mTLS communication, a common root CA was configured. Since there are no special networking limitations for this topology, it is the easiest approach to get started with an Istio multicluster deployment.
In the bookinfo deployment example, you learned how to use Istio route rules to distribute the versions of a service across multiple clusters with multiple control plane topology. Services in each cluster can access other local services using their Kubernetes FQDN. For example, the productpage service calls the local details service via details.default.svc.cluster.local. For example, Istio provides a CoreDNS plugin that can be configured to handle service names to resolve remote services. The <namespace>.global parameter depends on the ServiceEntry configuration that you manually defined.